Modifying Points In Revit For Roof Plan

About Editing Floor And Roof Shape Revit Products 2019 Autodesk Knowledge Network

How To Create A Foundation Plan In Revit Architecture Revit Architecture Architecture How To Plan

Revit 2018 Adding Trusses Using Revit Extensions Timber Roof Ads Roof Trusses
Video Shape Editing Roof And Floor Slabs Revit Products 2019 Autodesk Knowledge Network
Modify The Shape Of A Roof Or Structural Floor Revit Products 2019 Autodesk Knowledge Network

Revit For Mep Electrical Lighting Systems Circuits Switches And Annotation Lighting System Architecture Presentation Switches

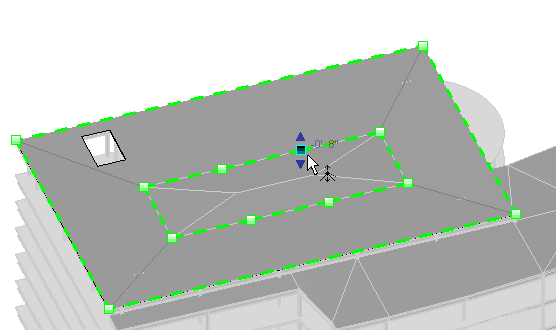
Add point or split line if better suited creates points at intersections place your new points as required.
Modifying points in revit for roof plan.

Revit Architecture Modeling Custom Components Part 1 Revit Architecture Revit Tutorial Architecture Model

Optimizing Your Revit Workstation For Point Clouds Point Cloud Optimization Building Information Modeling

Revit Conceputal Massing 04 Wall Roof By Face Revit Tutorial Autodesk Revit Mass

Mwf Homebuilder Suite Intro In Revit Revit Tutorial Building Information Modeling Revit Architecture

Autodesk Revit Tutorials 09 Adding Windows Revit Tutorial Autodesk Revit Tutorial

1 Revit 3d Model Kerala Houses Design Revit Architecture

Bonus 00 Modifying Revitcity Family Youtube Design Floor Plans Interior Design

Revit Tips Spanish Roof Adaptive Insane Version Revit Tutorial Autocad Revit Roof

Bim Revit Adaptive Component 04a Modeling Tensile Fabric Structure L Canopy Youtube Fabric Structure Revit Tutorial Tensile Structures

10 1 18 Visionrez 2019 Editing Tools For Revit Roof S

Revit Bim Architectural Services Advenser Specialized In Bim Offers High Quality Building Information Mo Revit Architecture Building Information Modeling Bim

Revit Architecture 2011 Beginners Tutorial 4 Windows Doors Wall Assembly Via Youtube Revit Architecture Revit Tutorial Architecture

Linking Autocad Surveys Into Revit Using Shared Coordinates Autocad Coordinates How To Plan
Roof Cutoff Level Youtube

Autodesk Revit Revision Numbering By Project By Sheet Autodesk Revit Design Projects

Revit Tutorial Revit Families Parametric Family In Revit Building Information Modeling Architecture Program Revit Tutorial

Back To Basics And Shared Coordinates By Michael Coffey And Jason Chen Ny Bim Revit Architecture Interior Rendering Back To Basics

Topography Kite Tutorials Is Educational Channel In Urdu Language Revit Architecture Revit Tutorial Architecture
Https Encrypted Tbn0 Gstatic Com Images Q Tbn 3aand9gcrplf3jybqa68uaqyzrihxaodv2rr9mp 4b3kermrhizhkv0ton Usqp Cau

Instacrete Rcccad Add Grids And Level Automatic Https Youtu Be Bpt Jmwntga Youtube Ads Grid

Bim Revit Adaptive Component 03b Geodesic Dome Steel L Fabric L Tent S Geodesic Dome Geodesic Shell Structure

The Proving Ground By Nathan Miller Case Learning Dynamo Essentials Nathan Miller Learning Case

Basics Revit Pure Revit Tutorial Architecture Learn Revit Revit Tutorial

Autodesk Revit Wooden Roof Structure Youtube Roof Structure Timber Roof Roof Architecture

Revit Roof Basics 04 Intersect By Roof Join Cadclips Youtube

Bringing Sketches To Revit Converting Hand Drawn Work To Professional L How To Draw Hands Sketches Bring It On

Revit 1 7 Roofs Hip Gable Dormer Revit Tutorial Revit Tutorial Dormers Ceiling Plan

Revit Tutorials Import 3d Site Topo Surface From Sketchup Revit Tutorial Tutorial Revit Architecture

Plan Your Work And Work Your Plan Revit Tutorial How To Plan Structure Architecture

Revit Landscape Training Course Revit Tutorial Revit Tutorial Architecture Revit Architecture

Full Project Using Revit Structure 1 Civil Engineering Community Civil Engineering Software Civil Engineering Engineering

Autodesk Revit Live Can Transform Any Revit Model Into Immersive Visualizations With A Single Mouse Autodesk Revit Building Information Modeling Revit Tutorial

Dynamo Spanish Roof Tile Generator

Parametric Shaded Walkway Parevitism Revit Gigabidea Revit Architecture Building Information Modeling Parametric

Mwf Pro Metal S Robust Features Make It The Industry Standard In Revit Framing Software Steel Frame Steel Detail Steel

Modeling A Cabinet Family In Revit Cabinet Revit Tutorial Design

Revit Architecture Modeling Custom Stair Shapes Revit Architecture Diagram Architecture Architecture

Modify Structural Beam Joins Revit Miter Beams Revit Disallow Join Beams Revit Beams Wood Beams Structures

In This Revit Video Tutorial You Will Learn The Process For Making The Model Of A Parametric Tnesile Cano Parametric Tent Design Building Information Modeling

Revit From Massing To A Structural Steel Frame Acero

The Proving Ground By Nathan Miller Case Learning Dynamo Essentials Parametric Design Architecture Presentation Generative Design

Revit Architecture Applying Skirting Using An Integrated Wall Sweep Revit Architecture Skirting Architecture

Revit 2012 Rendering Part 3 Interior Lighting Created By Dovile Puraite Mp4 Interior Design Classes Revit Architecture Software Design
Https Encrypted Tbn0 Gstatic Com Images Q Tbn 3aand9gcqsdi5i9e87hkpuxghrqfyigvgt Tpu04d8cer0rwtampcbg77l Usqp Cau
Source : pinterest.com
